In a previous article I showed how to backup a SQL database with the VDP Advanced agent. This article is going to show you how to restore a database from backup in the event that you accidentally deleted the database or want to restore over the top of the existing database. For this test I created a new database called TestDB in simple recovery mode and created a table called dbo.Test:
I then performed an application backup of the SQL server to capture the newly created database:
Performing a restore of a deleted database
In the first example I am going to delete the database and then perform a restore from backup. As you can see, I've now deleted the database from the SQL server:
In order to perform a restore simply navigate to the VDP plugin and click the Restore tab and navigate down the tree structure until you find the database that you wish to restore. Check it and then click the Restore button:
Verify the database that you have selected is correct and click Next:
Leave the Restore to original location check ticked and expand the Advanced Options and uncheck the Tail-log backup option. The tail-log backup option is only used for databases that use the full or bulk-logged recovery model. Once finished click Next:
Verify your settings and click Finish:
The restore job should start and you can monitor this via the Tasks pane within the web client. Once it's completed you should see the database has been restored with all data (Refresh SQL Management Studio if you left it open):
Performing a restore over an existing database
In this example I'm going to show you how to restore a database over the existing database. This is handy if you've accidentally deleted some data or some data is potentially corrupt. For this example I'm going to delete the dbo.Test table and then perform the restore over the top of the existing database. As you can see the table has been deleted:
Perform exactly the same steps as per the previous example and then monitor the job to ensure it completes successfully and then referesh the view in SQL Management Studio and you should see the returned data:
If you are experiencing any issues with the restore then check out the log files on the client at the following location:
C:\Program Files\avp\var
Below is an example of a log file with a successful restore:
<logheader platform="Windows Server 2012 Datacenter Server Edition (No Service Pack) 64-bit" process_id="avsql" version="7.0.182-99" tz="GMT Daylight Time" />
--------------------------------------------------------------------------------------------------------
----- START avsql log 2014-04-25 10:54:41 GMT Daylight Time [7.0.182-99 Windows Server 2012 Datacenter Server Edition (No Service Pack) 64-bit-AMD64]
--------------------------------------------------------------------------------------------------------
2014-04-25 10:54:41 avsql Info <5008>: Logging to C:\Program Files\avp\var\MOD-1398419682252-3006-SQL.log
2014-04-25 10:54:41 avsql Info <6673>: CTL listening on port 56549
2014-04-25 10:54:41 avsql Info <10684>: Setting ctl message version to 3 (from 1)
2014-04-25 10:54:41 avsql Info <16136>: Setting ctl max message size to 268435456
2014-04-25 10:54:41 avsql Info <17376>: Working on stand alone environment.
2014-04-25 10:54:41 avsql Info <7838>: - Adding user exclude "*/tempdb"
2014-04-25 10:54:42 avsql Warning <14282>: Option "Handle SQL services automatically" can only be used with option "Restore system databases."
2014-04-25 10:54:42 avsql Info <18824>: Compare hostname 'sql01.m80arm.local' with current machine hostname 'sql01'.
2014-04-25 10:54:42 avsql Info <7062>: Targets count 1
2014-04-25 10:54:42 avsql Info <7063>: target[0] = '(local)/TestDB/f-0'
2014-04-25 10:54:42 avsql Info <7065>: Working on target '(local)/TestDB/f-0'
2014-04-25 10:54:42 avsql Info <14293>: Creating a database task for '(local)/TestDB/f-0' (hcount 328)
2014-04-25 10:54:42 avsql Info <14245>: Creating a thread pool with 1 worker threads.
2014-04-25 10:54:42 avsql Info <14248>: Executing task: (local)/TestDB/f-0 --> vd_streams[1]
2014-04-25 10:54:42 avsql Info <14250>: VDI SQL Instance:
2014-04-25 10:54:43 avsql Info <14266>: Executing the data transfer task: (local)/TestDB/f-0.stream0
2014-04-25 10:54:43 avsql Info <9552>: Spawning 'C:\Program Files\avp\bin\avtar' (avtar --case_sensitive="false" --max-streams="1" --cacheprefix="avsql_t0" --ctlcallport="56549" --ctlinterface="3006-MOD-1398419682252#1" --check-stdin-path="false" --logfile="C:\Program Files\avp\var\MOD-1398419682252#1-3006-SQL.avtar.log" --vardir="C:\Program Files\avp\var" --bindir="C:\Program Files\avp\bin" --sysdir="C:\Program Files\avp\etc" --acnt="/clients/VDPApps/sql01.m80arm.local" --id="restoreonly" --ap="****************" --server="vdp.m80arm.local")
2014-04-25 10:54:43 avsql Info <6686>: Process 2552 (C:\Program Files\avp\bin\avtar) for workorder MOD-1398419682252#1 started
2014-04-25 10:54:43 avsql Info <10684>: Setting ctl message version to 3 (from 1)
2014-04-25 10:54:43 avsql Info <16136>: Setting ctl max message size to 268435456
2014-04-25 10:54:43 avsql Info <7732>: Waiting for avtar to finish
2014-04-25 10:54:43 avsql Info <6688>: Process 2552 (C:\Program Files\avp\bin\avtar) finished (code 0: success)
2014-04-25 10:54:43 avsql Info <6446>: SQL VDI transfer of '(local)_TestDB_MOD-1398419682252-3006-SQL' to '(local)/TestDB/f-0' successful
2014-04-25 10:54:43 avsql Info <14275>: There is no more tasks to process.
2014-04-25 10:54:43 avsql Info <14271>: Waiting for worker threads to finish ...
2014-04-25 10:54:43 avsql Info <16256>: Creating process summary ...
2014-04-25 10:54:43 avsql Info <16257>: Inserted task: 1, completed: 1, aborted: 0.
2014-04-25 10:54:43 avsql Info <7271>: Final summary generated subwork 1, cancelled/aborted 0, snapview 1, exitcode 0
2014-04-25 10:54:48 avsql Info <6451>: avsql returning with exitcode 0
--------------------------------------------------------------------------------------------------------
----- END avsql log 2014-04-25 10:54:48 GMT Daylight Time (1 warning, 0 errors, 0 fatal errors)
--------------------------------------------------------------------------------------------------------
Showing posts with label VDP. Show all posts
Friday, 25 April 2014
Thursday, 24 April 2014
Backing up SQL Databases with the VDP Advanced SQL Agent
In this article I'm going to show you how to backup SQL databases using the VMware Data Protection Advanced SQL agent. The first thing you need to do is download and install the SQL agent on your SQL server (If using SQL 2012 then please refer to this blog article). The SQL agent can be downloaded from the Configuration tab within the VDP plugin and you have the choice of either the 32 or 64bit version:
Select Applications and click Next:
Select any additional backup options and click Next. For this example I'm just going to leave all the defaults but the VDP 5.5.5 admin guide explains them in more detail:
Configure the required schedule and click Next:
Give the backup job a suitable name and then click Next:
Verify that all the information is correct and click Finish to create the job:
Once the backup job has been created it should appear in the list of jobs:
Now you can either leave the job to run at it's next scheduled time or manually run the job by selecting the job and then Backup Now -> Backup All Sources:
Leave the job to run for a few minutes and then refresh the screen and hopefully it should have completed successfully. You can also monitor the job via the log file within the configuration tab or via the web client tasks pane. Once the job has completed successfully verify that the backups are actually there by clicking on the Restore tab and navigating to the server and databases:
Once downloaded simply copy it the SQL server and install as per any other application. I'm not going to go through this process as we've all done time many times before. Once installed you should see the Backup Agent service:
Now go back to the VDP plugin within the web client, select Backup and then create a new backup job:
Select the option for Selected databases to perform database backups rather than a full server backup and click Next:
Drill down and select the database(s) that you require or select the server to backup all databases on the server and click Next. If your using SQL 2012 you may need to grant the local System account permission. You can find out how to do this here:
Configure the required schedule and click Next:
Select the required retention policy and click Next:
Verify that all the information is correct and click Finish to create the job:
Once the backup job has been created it should appear in the list of jobs:
Now you can either leave the job to run at it's next scheduled time or manually run the job by selecting the job and then Backup Now -> Backup All Sources:
Leave the job to run for a few minutes and then refresh the screen and hopefully it should have completed successfully. You can also monitor the job via the log file within the configuration tab or via the web client tasks pane. Once the job has completed successfully verify that the backups are actually there by clicking on the Restore tab and navigating to the server and databases:
Wednesday, 23 April 2014
VDP Advanced SQL Agent Permissions
I've been playing around with the VDP Advanced appliance recently and can across this little gotcha when using the SQL agent to backup individual databases. After downloading and installing the agent on my SQL server and creating a new application backup job when it came to selecting the databases I would only see the default three which were master, msdb and tempdb:
I removed the vCenter service account from the local administrators group and added it to a global SQL administrators group just to tidy things up. Remember this is my lab environment so I'm comfortable with the vCenter service account having those permissions.
Update - 23/04/2014
The VDP 5.5.5 Admin Guide does actually advise you regarding this issue on Page 145 as this is applicable to SQL 2012:
After searching for a while I was unable to find anything relating to this error and the VDP 5.5.5 Admin Guide doesn't mention the fix. I assumed it would be a permission problem so I added the vCenter service account to the local administrators group to ensure it had full access to SQL. This didn't resolve the issue, I then checked the Backup Agent service which was running as the Local System user and realised that it obviously didn't have permission to SQL. I changed this account to run as the vCenter service account and then created the backup job again and hey presto:
I removed the vCenter service account from the local administrators group and added it to a global SQL administrators group just to tidy things up. Remember this is my lab environment so I'm comfortable with the vCenter service account having those permissions.
Update - 23/04/2014
The VDP 5.5.5 Admin Guide does actually advise you regarding this issue on Page 145 as this is applicable to SQL 2012:
Monday, 7 April 2014
VDP Advanced Error - Failed to initiate a backup or restore for a virtual machine. Probable cause is the datastore for the virtual machine is not accessible
I've recently been upgrading all of my VM's from Windows 2012 to 2012 R2 and now it was time to deploy a new domain controller. I build the new DC, promoted it and migrated DHCP etc and all was well. It was then time to re-configure all my VM's to point to the new DC for DNS resolution. I changed the VDP appliance to use the new DC for DNS and rebooted as requested. When checking my backups the next day I realised that they have all failed with the following error:
Error: Failed to initiate a backup or restore for a virtual machine. Probable cause is the datastore for the virtual machine is not accessible
In order to try and resolve the issue I change the DNS server back to the original DC and rebooted. I really didn't think this caused the initial issue but it was the only thing that had changed. As expected, this didn't resolve the issue. When searching for the resolution I did come across this KB article which asks you to verify that all datastores are actually associated with hosts but this did not resolve my issue. I finally tried rebooting the hosts to see if this resolved and also re-creating the backup job but no success.
After following Cormac Hogans (Blog | Twitter) excellent article I realised that there were no log files available from the date the issue started happening which was Thursday 3rd April (Last successful backup was on the 2nd April)
So, I guess what I'm really asking now is has anyone else seen this issue or can anyone point me in a direction to start investigation?
Update - 7/04/2014
After searching through various log files and google I did find this article which shows an error message that I was seeing in one of the log files. The resolution was to stop and start the MCS service with the following commands via an SSH session:
dpnctl stop mcs
dpnctl start mcs
After doing this the backups still failed but I then gave the appliance another reboot and it looks like that might have resolved it. A backup of an individual machine is currently running so I'll see what happens tomorrow morning
Update - 8/04/2014
All backups have completed successfully last night so looks like the fix above has worked.
Tuesday, 28 January 2014
Creating and running an Automated Backup Verification job in VDP 5.5 Advanced
Click on the Backup Verification Job Actions icon and select New:
Select the virtual machine that you want to enable the automatic backup verification job for and click Next:
If you would like to run a script within the virtual machine after the restore then enter the required information. In this example I'm not going to bother so I'll just click Next:
You now need to specify a destination path to restore the virtual machine to. This needs to be a specific host. Simply click the Choose button and then navigate to the host that you would like to restore the virtual machine to and click OK:
Specify what Datastore you would like to restore the virtual machine to. In my example I'm just going to use the locally attached datastore rather than an iSCSI or NFS datastore. Once finished click Next:
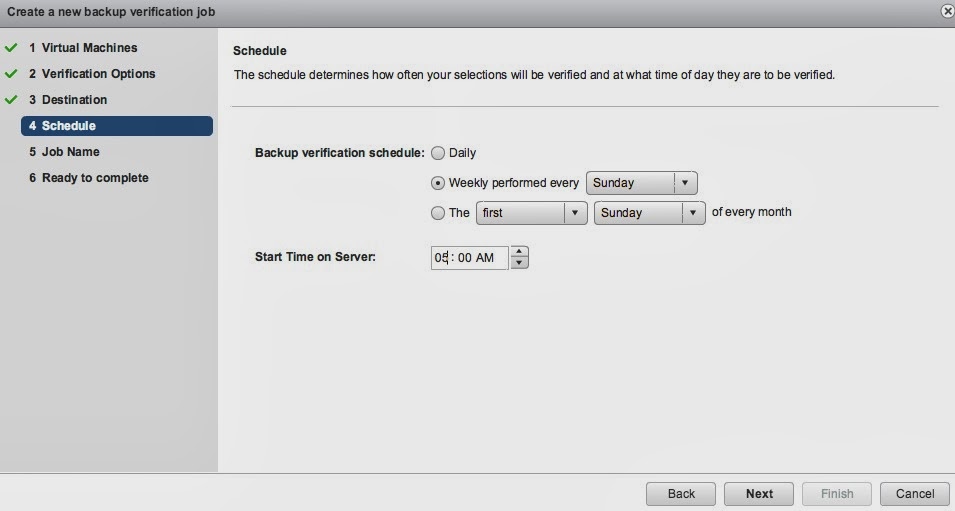
Now select a schedule of when you would like this job to run. In this example I'm going to run it every Sunday at 05:00. Click Next when finished:
Give the backup job a name and click Next:
Finally verify all your settings are correct and click Finish:
The backup job should be created successfully and you should see it appear in the list:
You have now successfully created an automated backup verification job. You can either wait until the scheduled date / time or manually run the job. To manually run the job simply click Verify Now:
The restore job will start and you can monitor it's progress via the Task Console:
You will also see the virtual machine appear in the web client inventory view:
The virtual machine will be restored, powered on and once a heartbeat has been received from VMtools it will be powered off and then removed from the environment. It's important to point out that the virtual machine will be connected to an internal only network so as not to interfere with production systems. If the automated backup verification completed successfully then you will see the results in the reports tab within the VDP appliance (Just ensure you select the option to show backup verification):
You are now safe in the knowledge that your backups can be restored and you have a mechanism to prove to management or audit that these tests are being completed on a regular basis.
Wednesday, 22 January 2014
Upgrading from VDP 5.5 to VDP Advanced 5.5
In this post I'm quickly going to show you how to upgrade from VDP 5.5 (Specifically 5.5.5.180) to VDP Advanced 5.5. I have VDP 5.5 running in my home lab obviously for backup purposes but I want to look into the product further, specifically the replication and automated backup verification features which are only available with the advanced version. The following FAQ article has some great information about the product.
So, in order to upgrade the license you should log into the vSphere Web Client and connect to the VDP appliance:
Once connected click the Add a VDP Advanced License Key which should be presented as soon as you connect. Obviously if you have already assigned the license key on install you can ignore this:
Click on the cog icon and Assign a New License Key:
So, in order to upgrade the license you should log into the vSphere Web Client and connect to the VDP appliance:
Click on the cog icon and Assign a New License Key:
Enter the license key and click Decode:
Click on the hosts that you want to assign to this license key and click OK:
Your VDP appliance should now be licensed. You now need to switch to the advanced version by clicking on the Switch to VDPA button in the configuration screen:
You will be presented with a warning message advising that you cannot undo this change. Click Yes:
You will see a message advising that the upgrade was successful, click OK:
You will be asked to re-connect again and once you do if you check the Configuration tab you should see that you are now running the Advanced version:
Subscribe to:
Posts (Atom)