Pages

Showing posts with label Puppet / Razor. Show all posts

Thursday, 13 June 2013

Installing and Testing the Puppet Agent Software – Windows

In my previous post I showed you how to install the puppet agent software on a Linux box (Specifically Centos).  This article shows you the steps to install the agent on a Windows box (Specifically Windows Server 2012). 

Prior to installing ensure you have added .NET Framework 3.5 feature via Server Manager.  Download the Windows puppet installer and copy up to your server.  In this example I will be using puppet-enterprise-2.8.1.msi.  Once this has been copied up start the installation and click Next to continue:

image
Accept the license agreement and click Next:

image
Enter the hostname of the puppet master server and click Next to continue:

image
Finally click Install to start:

image
The installation should take a few minutes to complete and the click Finish to complete:

image
Once the agent software has installed you will have to approve the request as per the previous article with the following command:

puppet cert sign <hostname>

image
Once you have approved the request the server should appear within the puppet master GUI within 30 minutes:

image
In the next article I plan on showing you exactly what you can do with puppet so stay tuned.

Wednesday, 5 June 2013

Installing and Testing the Puppet Agent Software – Linux

In my previous article I showed you how to install the puppet master server and test to ensure it installed correctly.  In this article I’m going to show you how to install the puppet agent software on a linux box and test to ensure it’s successfully talking to the puppet master.  I’ll assume you’ve already downloaded the puppet installation files and copied up to your server.  Log onto your agent server, browse to the installation directory and run the following command:

./puppet-enterprise-installer

Select No when asked if you wish to install the puppet master components:

image

Select No when prompted if you want to install the cloud provisioner:

image

Select No when asked if you want to install the console:

image

Select Yes when prompted if you want to install the agent:

image

When prompted for the unique name for the agent just accept the default name which should be the hostname:

image

When prompted enter the puppet master hostname:

image

Select Yes to import the puppet labs GPG key:

image

Select Yes to install the packages automatically:

image

Select Yes to create the symbolic links to the puppet executables:

image

Finally select Yes to perform the installation:

image

The installations starts and hopefully completes within a few minutes:

image

The puppet agent software is now installed.  We now need to approve the request on the puppet master server.  SSH into the box and run the following command:

puppet cert list

We can see that we have a request from the puppet agent server:

image

To accept the request run:

puppet cert sign <hostname>


image

This request should also be removed if you run the cert list command again.  To test the agent can communicate with the master simply run:

puppet agent –test

image

You agent has successfully communicated with the puppet master.  If we now log into the master GUI you should see both the agent and the master:

image

In the next article I will show you how to install the puppet agent software on a windows box.

Tuesday, 28 May 2013

Installing Puppet Master

This is the first part in a series of yet unknown posts about my experience in attempting to learning Puppet and Razor.  So, exactly what is Puppet and Razor?  The following are paragraphs taken directly from the products homepage:

Puppet
Puppet Enterprise is IT automation software that gives system administrators the power to easily automate repetitive tasks, quickly deploy critical applications, and proactively manage infrastructure, on-premise or in the cloud.

Razor
Project Razor is a power control, provisioning, and management application designed to deploy both bare-metal and virtual computer resources. Razor provides broker plugins for integration with third party such as Puppet.

Before I start I would like to point out that there is a great Quick Start guide provided by Puppet Labs which basically takes you through the entire process.  In my lab I have two newly built Centos 6.2 VM's called puppetmaster.domain.local and puppetagent.domain.local.  Both VM's have static IP addresses and forward / reverse addresses in DNS.  The usual checks have been performed to ensure both hosts can see each other and the internet.  I've also downloaded the latest version of Puppet Enterprise for Centos 6.2 which includes 10 complimentary agent nodes and sftp'd this up to the /tmp directory on both VM's.

We will start by installing the puppet server software and the first step is to extract the puppet installation files (File versions may vary).  CD into the /tmp directory and run the following command:

tar -zxvf /puppet-enterprise-2.8.1-el-6-x86_64.tar.gz

CD into /puppet-enterprise-2.8.1-el-6-x86_64 directory and run:

./puppet-enterprise-installer

When asked if you wish to install puppet master enter Y.  If you were only planning on installing the agent software then obviously you would select N:image

When asked about installing the cloud provisioner select Y:

image

Select Y to install the console:image

Verify the puppet master certificate name and press enter when happy:image

Verify the puppet master certificate DNS aliases and press enter when happy:image

Provide an admin email address for accessing the console:image

Provide an admin password for accessing the console:image

Enter an SMTP server for email notifications:image

Select Y to install the MySQL database server:image

Select Y to install the Puppet Labs public key:image

Select Y to confirm the installation of all the required packages:image
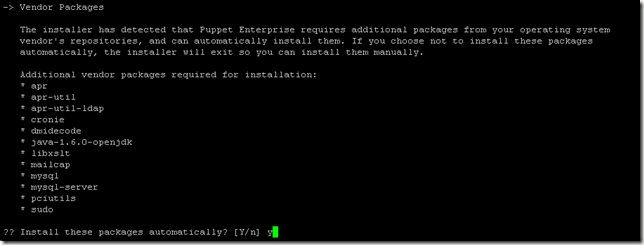
Select Y to create the symbolic links:image

Select Y to perform the installation:image

The installation of the puppet master software took approximately 8 minutes to complete.  Once completed you will be advised of the web interface URL and any firewall ports that are required to be opened:image
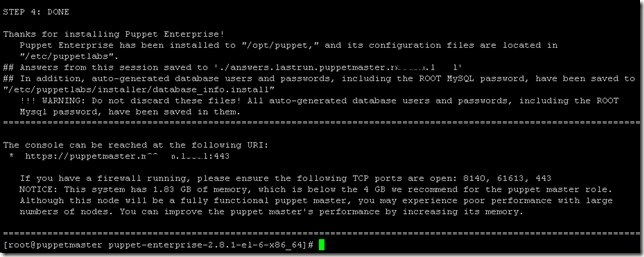
You won’t be able to browse to the Web Interface URL just yet as we need to open the required ports.  To do this I simply added the following text into the /etc/sysconfig/iptables file and restart the iptables service with service iptables restart:

-A INPUT -m state --state NEW -m tcp -p tcp --dport 443 -j ACCEPT
-A INPUT -m state --state NEW -m tcp -p tcp --dport 8140 -j ACCEPT
-A INPUT -m state --state NEW -m tcp -p tcp --dport 61613 -j ACCEPT
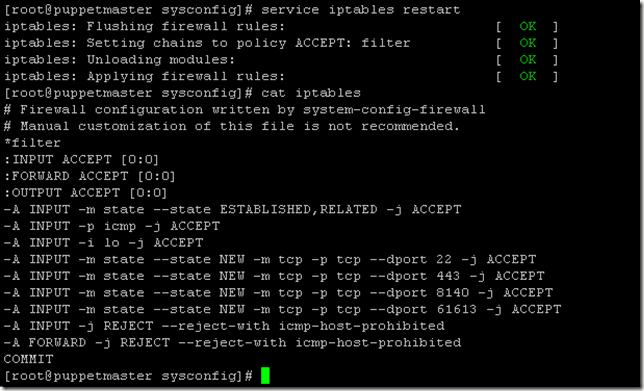
image

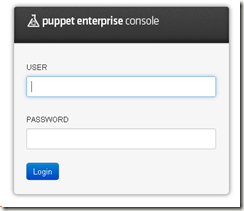
Browsing to https://puppetmaster.domain.local should display a log in box to the web interface GUI which you should be able to log in with the using the credentials that were configuring during the installation:
image

Congratulations, the puppet master server is now up and running.  Up next we will install the puppet agent software on both a linux and windows VM.


