The content catalogue for VMworld 2013 is now up for both San Francisco and Barcelona so I thought I’d write up what sessions I plan on attending (Obviously depending on any clashes). I've prioritised them based on what sessions I definitely want to attend and then sessions I would like to attend if time and if it doesn't clash with another session.
Definite Sessions
VCM5539 - The Missing Link: Storage Visibility In Virtualized Environments
PHC5020 - VMW Customer Hybrid Cloud with a VMW SP Public Cloud
BCO5129 - Protection for All - vSphere Replication & SRM Technical Update
NET5184 - Designing Your Next Generation Datacenter for Network Virtualization
NET5847 - NSX: Introducing the World to NSX
SEC5755 - NSX with Next Generation Firewalling from Palo Alto Networks
STO4791 - Just Because You Could, Doesn't Mean You Should: Lessons Learned in Storage Best Practices (v2.0)
STO4798 - Software-Defined Storage: The VCDX Way
VAPP4724 - Virtualizing Databases: Doing IT Right
VCM4555 - vCenter Operations Management - Troubleshooting Best Practices
VCM4885 - Tech Preview: New VM Loaded Cost Modeling
VCM4992 - Tips and Tricks for Capacity Rightsizing and Planning
VCM5169 - How to troubleshoot VM performance issues across applications, infrastructure and storage using vCenter Operations Management(Live Demonstration!)
VSVC4605 - What's New in VMware vSphere?
VSVC4830 - vCenter Deep Dive
If Time Sessions
VAPP4679 - Software-Defined Datacenter Design Panel for Monster VM's: Taking the Technology to the Limits for High Utilisation, High Performance Workloads
BCO5431 - Customers and Service Provider's Perspectives on DR Strategy, Tips and Tricks for Private and Hybrid Cloud Environments
BCO4872 - Operating and Architecting a vSphere Metro Storage Cluster Based Infrastructure
NET5516 - A Class on Network Virtualization with VMware NSX for Multi-Hypervisor
NET5521 - vSphere Distributed Switch - Design and Best Practices
NET5790 - Operational Best Practices for VMware NSX
NET5796 - Virtualization and Cloud Concepts for Network Administrators
STO6123 - Health, Risk and Efficiency Assessment of SAN Infrastructure with vCenter Operations Manager (vCOPS)
VAPP4679 - Software-Defined Datacenter Design Panel for Monster VM's: Taking the Technology to the Limits for High Utilisation, High Performance Workloads
VCM4891 - Performance Management of Business Critical Applications using vCenter Operations Manager
VCM5008 - vCenter Operations and the Quest for the Missing Metrics
VCM5009 - Practical Real World Reporting with vCenter Operations
VCM5472 - vCO - Say Hi to Razor and Software Defined Storage
VSVC5353 - Mythbusting Goes Virtual
Obviously this list is all subject to change. Once the registration process opens and my places have been confirmed I'll put up my calendar for the week.
Monday, 17 June 2013
Thursday, 13 June 2013
Installing and Testing the Puppet Agent Software – Windows
In my previous post I showed you how to install the puppet agent software on a Linux box (Specifically Centos). This article shows you the steps to install the agent on a Windows box (Specifically Windows Server 2012).
Prior to installing ensure you have added .NET Framework 3.5 feature via Server Manager. Download the Windows puppet installer and copy up to your server. In this example I will be using puppet-enterprise-2.8.1.msi. Once this has been copied up start the installation and click Next to continue:

Accept the license agreement and click Next:

Enter the hostname of the puppet master server and click Next to continue:

Finally click Install to start:

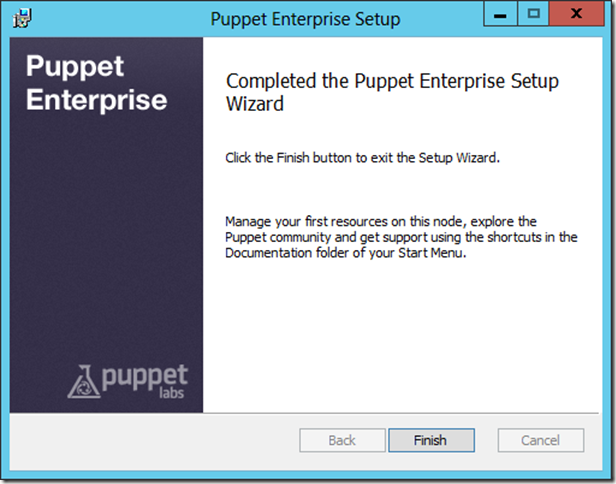
The installation should take a few minutes to complete and the click Finish to complete:
Once the agent software has installed you will have to approve the request as per the previous article with the following command:
puppet cert sign <hostname>

Once you have approved the request the server should appear within the puppet master GUI within 30 minutes:

In the next article I plan on showing you exactly what you can do with puppet so stay tuned.
Prior to installing ensure you have added .NET Framework 3.5 feature via Server Manager. Download the Windows puppet installer and copy up to your server. In this example I will be using puppet-enterprise-2.8.1.msi. Once this has been copied up start the installation and click Next to continue:

Accept the license agreement and click Next:

Enter the hostname of the puppet master server and click Next to continue:

Finally click Install to start:

The installation should take a few minutes to complete and the click Finish to complete:

Once the agent software has installed you will have to approve the request as per the previous article with the following command:
puppet cert sign <hostname>

Once you have approved the request the server should appear within the puppet master GUI within 30 minutes:

In the next article I plan on showing you exactly what you can do with puppet so stay tuned.
Wednesday, 5 June 2013
Installing and Testing the Puppet Agent Software – Linux
In my previous article I showed you how to install the puppet master server and test to ensure it installed correctly. In this article I’m going to show you how to install the puppet agent software on a linux box and test to ensure it’s successfully talking to the puppet master. I’ll assume you’ve already downloaded the puppet installation files and copied up to your server. Log onto your agent server, browse to the installation directory and run the following command:
./puppet-enterprise-installer
Select No when asked if you wish to install the puppet master components:

Select No when prompted if you want to install the cloud provisioner:

Select No when asked if you want to install the console:

Select Yes when prompted if you want to install the agent:

When prompted for the unique name for the agent just accept the default name which should be the hostname:

When prompted enter the puppet master hostname:

Select Yes to import the puppet labs GPG key:

Select Yes to install the packages automatically:

Select Yes to create the symbolic links to the puppet executables:

Finally select Yes to perform the installation:

The installations starts and hopefully completes within a few minutes:

The puppet agent software is now installed. We now need to approve the request on the puppet master server. SSH into the box and run the following command:
puppet cert list
We can see that we have a request from the puppet agent server:

To accept the request run:
puppet cert sign <hostname>

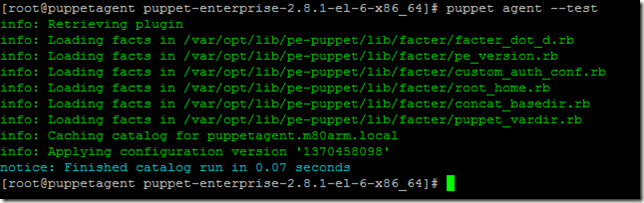
This request should also be removed if you run the cert list command again. To test the agent can communicate with the master simply run:
puppet agent –test

In the next article I will show you how to install the puppet agent software on a windows box.
./puppet-enterprise-installer
Select No when asked if you wish to install the puppet master components:

Select No when prompted if you want to install the cloud provisioner:

Select No when asked if you want to install the console:

Select Yes when prompted if you want to install the agent:

When prompted for the unique name for the agent just accept the default name which should be the hostname:

When prompted enter the puppet master hostname:

Select Yes to import the puppet labs GPG key:

Select Yes to install the packages automatically:

Select Yes to create the symbolic links to the puppet executables:

Finally select Yes to perform the installation:

The installations starts and hopefully completes within a few minutes:

The puppet agent software is now installed. We now need to approve the request on the puppet master server. SSH into the box and run the following command:
puppet cert list
We can see that we have a request from the puppet agent server:

To accept the request run:
puppet cert sign <hostname>

puppet agent –test

You agent has successfully communicated with the puppet master. If we now log into the master GUI you should see both the agent and the master:

Friday, 31 May 2013
Windows 8 with UK Language fails to install RSAT
I came across a strange issue recently when attempting to install the Remote Server Admin Tools (RSAT) on a fully patched Windows 8 VM (The issue was encountered on VM but I assume I would have the same issue with a physical desktop / laptop). I download the x64 version from Microsoft and proceeded to install. After accepting the license agreement the installation started and then completed straight away:

Now I knew the tools were not already installed so I attempted to install the x86 version and encountered the usual message advising that I should use the x64 (Which is what I expected). After searching many TechNet forums I came across a few posts that advised that the tools will not install unless you have the English (United States) language pack installed. I though this couldn’t be correct and set about testing just in case. To install the English (United States) language pack open the Control Panel and select Add a Language:

Browse to English and double click. From there select the English (United States)

You should now see both English (United Kingdom) and English (United States).

Click on the English (United States) and select the option to Download and install language pack (accept any prompts along the way):

Once the language pack has downloaded and installed simply start the RSAT installation again and it should install correctly this time:

Once finished you can install the required RSAT tool via Programs and Features.


Browse to English and double click. From there select the English (United States)

You should now see both English (United Kingdom) and English (United States).

Click on the English (United States) and select the option to Download and install language pack (accept any prompts along the way):

Once the language pack has downloaded and installed simply start the RSAT installation again and it should install correctly this time:

Once finished you can install the required RSAT tool via Programs and Features.
Thursday, 30 May 2013
Free Trainsignal Training for all 2013 vExperts
The guys over at Trainsignal have very kindly offered all 2013 vExperts online access to the entire Trainsignal training library for free for one year. This is an extremely generous offer from Trainsignal and would like to extend my thanks. I’ve grown up watching these videos and find them to be an excellent resource for getting to know a product very quickly. The instructors are all experts in their own fields and produce some valuable training material. So if you were recently nominated a vExpert for 2013 then head over here and request your free access.

P.s. They do check the list to ensure you are actually a vExpert
Wednesday, 29 May 2013
vExpert 2013
Well I’m pleased to announce that myself and 579 others have received the vExpert Award for 2013. So, what exactly is a vExpert?
“We’re pleased to announce the list of vExperts for 2013. Each of these vExperts have demonstrated significant contributions to the community and a willingness to share their expertise with others. We are blown away by the passion and knowledge in this group, a group that is responsible for much of the virtualization evangelism that is taking place in the world — both publicly in books, blogs, online forums, and VMUGs; and privately inside customers and VMware partners. Congratulations to you all!”
This is the first year that I have received the vExpert award and I am extremely honoured. The VMware community is great to be involved with and I’m constantly learning from my peers and industry experts. A big thanks go out to John Troyer and all the team involved. It must be a huge task to go through all applicants and verify all information. As an added bonus Tinti are offering all vExperts a free polo t-shirt with the vExpert logo and your twitter handle here.
Tuesday, 28 May 2013
Installing Puppet Master
This is the first part in a series of yet unknown posts about my experience in attempting to learning Puppet and Razor. So, exactly what is Puppet and Razor? The following are paragraphs taken directly from the products homepage:
Puppet
Puppet Enterprise is IT automation software that gives system administrators the power to easily automate repetitive tasks, quickly deploy critical applications, and proactively manage infrastructure, on-premise or in the cloud.
Razor
Project Razor is a power control, provisioning, and management application designed to deploy both bare-metal and virtual computer resources. Razor provides broker plugins for integration with third party such as Puppet.
Before I start I would like to point out that there is a great Quick Start guide provided by Puppet Labs which basically takes you through the entire process. In my lab I have two newly built Centos 6.2 VM's called puppetmaster.domain.local and puppetagent.domain.local. Both VM's have static IP addresses and forward / reverse addresses in DNS. The usual checks have been performed to ensure both hosts can see each other and the internet. I've also downloaded the latest version of Puppet Enterprise for Centos 6.2 which includes 10 complimentary agent nodes and sftp'd this up to the /tmp directory on both VM's.
We will start by installing the puppet server software and the first step is to extract the puppet installation files (File versions may vary). CD into the /tmp directory and run the following command:
tar -zxvf /puppet-enterprise-2.8.1-el-6-x86_64.tar.gz
CD into /puppet-enterprise-2.8.1-el-6-x86_64 directory and run:
./puppet-enterprise-installer
When asked if you wish to install puppet master enter Y. If you were only planning on installing the agent software then obviously you would select N:

When asked about installing the cloud provisioner select Y:

Select Y to install the console:

Verify the puppet master certificate name and press enter when happy:

Verify the puppet master certificate DNS aliases and press enter when happy:

Provide an admin email address for accessing the console:

Provide an admin password for accessing the console:

Enter an SMTP server for email notifications:

Select Y to install the MySQL database server:

Select Y to install the Puppet Labs public key:

Select Y to confirm the installation of all the required packages:

Select Y to create the symbolic links:

Select Y to perform the installation:

The installation of the puppet master software took approximately 8 minutes to complete. Once completed you will be advised of the web interface URL and any firewall ports that are required to be opened:

You won’t be able to browse to the Web Interface URL just yet as we need to open the required ports. To do this I simply added the following text into the /etc/sysconfig/iptables file and restart the iptables service with service iptables restart:
-A INPUT -m state --state NEW -m tcp -p tcp --dport 443 -j ACCEPT
-A INPUT -m state --state NEW -m tcp -p tcp --dport 8140 -j ACCEPT
-A INPUT -m state --state NEW -m tcp -p tcp --dport 61613 -j ACCEPT

Browsing to https://puppetmaster.domain.local should display a log in box to the web interface GUI which you should be able to log in with the using the credentials that were configuring during the installation:

Congratulations, the puppet master server is now up and running. Up next we will install the puppet agent software on both a linux and windows VM.
Subscribe to:
Posts (Atom)